
THE AMERICAN CIVIL WAR GAMING CLUB
Competition - honor - friendship
camaraderie - respect - challenge


Est.
1997

I have always felt that WDS Antietam is one of the best all-around games in the Civil War series. From Bull Run to Antietam, this game covers the first year of the Civil War in northern Virginia and Maryland.
CONTENT
33 Total Scenarios Recommended
10 Rated "Excellent"
NOTE: ALL NUMBERS HERE REFLECT THE ACTIVE STRENGTHS OF THE ARMIES. THESE NUMBERS DO NOT INCLUDE PERMANENTLY FIXED UNITS.
21 Turns
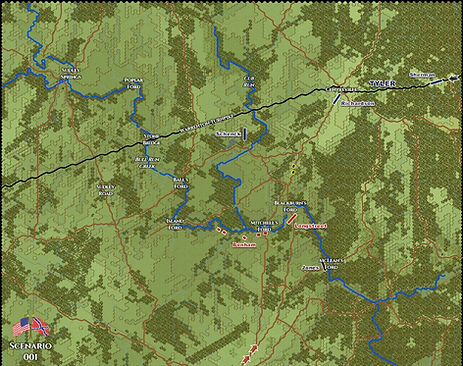
001 - Blackburn's Ford (Historical)
My Rating: Good
9,699
8,958
341
400
16
TOTAL
Infantrymen
Cavalrymen
Artillerymen
Cannons
8,585
7,470
690
425
17
Description - (Historical, 21 Turns) General Tyler deploys one of his Union brigades near Blackburn's Ford. The Confederates, having crossed Bull Run Creek, are waiting for the Union attack.
Analysis - This battle can go a few different ways and is an enjoyable smaller scenario to engage in. Neither side has very many men to work with in this skirmish before the large battle still to come.
45 Turns
002 - First Bull Run (Historical)
My Rating: Good
22,461
21,020
341
1,100
44
TOTAL
Infantrymen
Cavalrymen
Artillerymen
Cannons
29,820
26,430
2,015
1,375
55
Description - (Historical, 45 Turns) Following the failed attack of the 18th on Blackburn's Ford, General McDowell formed the following plan. 1) Richardson's brigade will make a false attack on Blackburn's Ford. 2) Tyler's division is to move from Centerville towards the stone bridge on the Warrenton turnpike. A feign for the main attack. 3) The divisions of Hunter and Heintzelman will leave camp and diverge from the Warrenton turnpike at the by-road beyond Cub Run and take the road for Sudley Springs. These two divisions will launch the main attack on the Confederate right flank. 4) Miles' division will stay in reserve on the Centerville ridge.
Analysis - This will always be a fun scenario to play because of both its historical significance and its unique setup and battlefield. It is a real thinking man's scenario and one that can play out in numerous ways based on the early moves both players make.

42 Turns
005 - First Bull Run v.3
My Rating: Excellent
27,193
25,577
341
1,275
51
TOTAL
Infantrymen
Cavalrymen
Artillerymen
Cannons
29,670
26,430
2,015
1,225
49
Description - (What If, 42 Turns) Eager for a quick victory, both Union and Confederate forces are moving toward each other at a rapid pace. Both sides are seeking to be the first to cross Bull Run Creek and engage in battle.
Analysis - The addition of Miles's division evens up the numbers in this battle and creates a better rounded contest.

40 Turns
006 - First Bull Run v.4
My Rating: Good
28,791
27,225
341
1,225
49
TOTAL
Infantrymen
Cavalrymen
Artillerymen
Cannons
29,320
26,430
2,015
875
35
Description - (What if, 40 Turns) A meeting engagement. No VP hexes, except two exit hexes for both sides.
Analysis - A pretty good setup for a meeting engagement. Hunter, Heintzelman, and Runyon arrive from the northern side of the map (from different hexes) while Tyler and Miles arrive along the Warrenton Pike. Beauregard's Army arrives from the south while Johnston's Army comes from the west along the Pike.

010 - First Bull Run v.8
My Rating: Good
35 Turns
22,461
21,020
341
1,100
44
TOTAL
Infantrymen
Cavalrymen
Artillerymen
Cannons
24,079
20,889
2,015
1,175
47
Description - (What if, 35 Turns) This variation of the historical scenario will begin later and both opposing sides will be nearly ready to engage for position on the field of battle.
Analysis - Both armies are deployed and ready for battle in this setup. The Federals have Miles's division FIXED while the Rebels are without the brigades of Ewell, Holmes, and Jones. While these Confederate brigades have a 50% chance to release at 4 PM, they would hardly have enough time to join the battle. Therefore, I subtracted their numbers from the figures above. This is a great setup if you are looking to jump right into a battle. Both sides have some advantages and disadvantages at the start and both will have to compensate in some ways for these.

12 Turns
011- Matthew's Hill
My Rating: Good
6,274
5,608
341
325
13
TOTAL
Infantrymen
Cavalrymen
Artillerymen
Cannons
5,106
4,691
190
225
9
Description - (Historical, 12 Turns) The initial attack after crossing Sudley Ford. The 2nd Rhode Islanders will make first contact against Evans' Confederate brigade. The battle will slowly escalate.
Analysis - Historically the battle on Matthew's Hill took up a number of crucial hours and set up the success later in the battle on Henry House Hill for the Rebels. A fun, short, little scenario.

12 Turns
012 - Henry Hill
My Rating: Good
7,954
7,504
0
450
18
TOTAL
Infantrymen
Cavalrymen
Artillerymen
Cannons
12,697
12,137
335
225
9
Description - (Historical, 12 Turns) McDowell sends Captain Griffin's and Rickett's batteries to Henry Hill. Jackson stands his ground. Keyes has been redeployed and is out of the action. Evans, Bee, and Bartow have been driven back. Union forces will attempt to take Henry Hill. (Best play as the Rebels against the Union A/I)
Analysis - A chaotic fight for Henry House Hill.

12 Turns
013 - Henry Hill v.1
My Rating: Good
10,223
9,773
0
450
18
TOTAL
Infantrymen
Cavalrymen
Artillerymen
Cannons
9,769
9,209
335
225
9
Description - (What if, 12 Turns) (This variation has no routed or fixed units) McDowell sends Captain Griffin's and Rickett's batteries to Henry Hill. Jackson stands his ground. Keyes has been redeployed. Evans, Bee, and Bartow have been driven back. Union forces will attempt to take Henry Hill. (Best play as the Rebels against the Union A/I)
Analysis - The lack of routed Confederate units and the unfixed Federal forces make this short scenario a little more eventful and interesting than scenario 012.

81 Turns
014 - 2nd Bull Run (Historical)
My Rating: Good
66,915
58,166
5,149
3,600
144
TOTAL
Infantrymen
Cavalrymen
Artillerymen
Cannons
50,860
43,224
3,436
4,200
168
Description - (Historical, 81 Turns) The Union army, now commanded by General Pope is moving to attack Jackson's isolated Corps. Unaware that another Confederate Corps, commanded by General Longstreet is fast approaching, Pope launches a series of poorly coordinated attacks. Once in position, Longstreet launches a surprise attack to crush the Union left flank.
Analysis - This scenario is a fun one to play - sometimes. With little room to move this isn't going to be a battle of maneuver but rather one of battering one another until one side simply gives up.

81 Turns
019 - 2nd Bull Run v.5
My Rating: Good
66,915
58,166
5,149
3,600
144
TOTAL
Infantrymen
Cavalrymen
Artillerymen
Cannons
50,860
43,224
3,436
4,200
168
Description - (What if, 81 Turns) The Union army, now commanded by General Pope is moving to attack Jackson's isolated Corps. Unaware that another Confederate Corps, commanded by General Longstreet is fast approaching, Pope launches a series of poorly coordinated attacks. Once in position, Longstreet launches a surprise attack to crush the Union left flank. The 1st Division of the 1st Corps of the Army of Virginia has been repositioned to the Northeast. Hood's Confederate Division has been redeployed north of Jackson's Corps.
Analysis - I really like this setup as it allows the focus of the battle to be more evenly divided across the board.

81 Turns
020 - 2nd Bull Run v.6
My Rating: Excellent
66,915
58,166
5,149
3,600
144
TOTAL
Infantrymen
Cavalrymen
Artillerymen
Cannons
50,860
43,224
3,436
4,200
168
Description - (What if, 81 Turns) The Union army, now commanded by General Pope is moving to attack Jackson's isolated Corps. Unaware that another Confederate Corps, commanded by General Longstreet is fast approaching, Pope launches a series of poorly coordinated attacks. Once in position, Longstreet launches a surprise attack to crush the Union left flank. Pa Res Division repositioned to the Northeast. Hood's Confederate Division has been redeployed to the north of Jackson's Corps.
Analysis - This is another quality alternative to the historical Battle of Second Manassas setup.

10 Turns
023 - Battle of Groveton (Historic)
My Rating: Good
7,161
6,861
0
300
12
TOTAL
Infantrymen
Cavalrymen
Artillerymen
Cannons
7,497
7,172
0
325
13
Description - (Historical, 10 Turns) After attacking Bristoe Station and the Union supply depot at Manassas Junction, Stonewall Jackson moves onto Bull Run Creek. The site of the 1861 Manassas battlefield. Union General John Pope marches his army toward Centreville. There he hopes to surprise Jackson. Jackson also has plans to attack Pope's Army before it can merge with McClellan's Army of the Potomac. Along the way, Jackson spots King's division heading for Centreville. Jackson lurks in the woods, ready to attack. But Rufus King is not present due to an unexpected epileptic seizure.
Analysis - This is a short little skirmish preceding the Battle of Second Bull Run. With a limited number of men on both sides it is a quick play and usually a bloody one as the two sides collide in the fields around the Brawner Farm. I included Sullivan's FIXED Union brigade in the numbers here as it is unlikely you will play this without triggering his release at some point.

10 Turns
026 - Battle of Groveton v.3
My Rating: Good
7,161
6,861
0
300
12
TOTAL
Infantrymen
Cavalrymen
Artillerymen
Cannons
7,497
7,172
0
325
13
Description - (What if, 10 Turns) This variant unfixes Hatch for the Union, also Starke and Taliaferro for the Confederates.
Analysis - This battle, basically, starts with more unfixed units to move. This will likely lead to more action and a more dynamic skirmish.

12 Turns
030 - Battle of Groveton v.7
My Rating: Excellent
7,313
6,863
0
450
18
TOTAL
Infantrymen
Cavalrymen
Artillerymen
Cannons
11,530
10,553
552
425
17
Description - (What if, 12 Turns) This variant has Patrick deployed early. Also, all Confederates will start unfixed and must cutoff King's Division and exit as many pts as possible at (40,35), (34,50), or (12, 50). Game starts two turns earlier.
Analysis - A great scenario! A short battle with a ton of options and possible maneuvers. Play this one if you are looking for a fast scenario with a different twist to it.

40 Turns
031 - Antietam (Historical)
My Rating: Good
82,173
68,770
7,303
6,100
244
TOTAL
Infantrymen
Cavalrymen
Artillerymen
Cannons
36,319
29,773
1,521
5,025
201
Description - (Historical, 40 Turns) Following the battles for the gaps of South Mountain, General Robert E Lee, gathers his men near Sharpsburg, Maryland. Union General George McClellan is moving toward him. Though cautious, he continues to advance, but fears Lee will strike first. Lee's back is against the Potomac River, but McClellan's army waits for the attack order.
Analysis - Antietam can be an awful scenario, or a fantastic scenario, based on a few rolls of the die. The battle is intense from start to finish and will challenge both players fully.

40 Turns
034 - Antietam v.3
My Rating: Excellent
82,173
68,770
7,303
6,100
244
TOTAL
Infantrymen
Cavalrymen
Artillerymen
Cannons
36,319
29,773
1,521
5,025
201
Description - (Historical, 40 Turns) This variant of the historical scenario starts with no fixed Confederate units.
Analysis - This scenario really opens up the playbook for the Rebels and evens out the disadvantage of being so heavily outnumbered.
40 Turns
039 - Antietam v.8
My Rating: Good
82,323
68,770
7,303
6,250
250
TOTAL
Infantrymen
Cavalrymen
Artillerymen
Cannons
36,501
29,780
1,521
5,200
208
Description - (What if, 40 Turns) This variant of the historical scenario places A.P. Hill's division in a fixed position north of Sharpsburg.
Analysis - This scenario adds AP Hill's Division to the map at Nicodemus Heights on Jackson's left flank. Hill's division is reinforced by Thomas's Brigade (378 men) for the battle. The setup allows the Confederates more options at the start.

16 Turns
043 - North Woods (Historical)
My Rating: Excellent
18,315
16,815
0
1,500
60
TOTAL
Infantrymen
Cavalrymen
Artillerymen
Cannons
16,968
13,462
1,156
2,350
94
Description - (Historical, 16 Turns) Following the battles for the gaps of South Mountain, General Robert E Lee, gathers his men near Sharpsburg, Maryland. Union General George McClellan is moving toward him. Though cautious, he continues to advance, but fears Lee will strike first. Lee's back is against the Potomac River, but McClellan's army waits for the attack order. Here the Attack will begin. Hooker's 1st Corps and Mansfield's 12th Corps will be the first to engage the Confederates north of Sharpsburg.
Analysis - For a short scenario, this thing rocks! It slightly favors the Confederates but can be won by either side depending on how skilled the players are and how prepared they are for the scenario.

16 Turns
045 - South Sharpsburg (Historical)
My Rating: Good
10,608
10,243
115
250
10
TOTAL
Infantrymen
Cavalrymen
Artillerymen
Cannons
6,717
5,792
0
925
37
Description - (Historical, 20 Turns) Although the morning had seen bloody combat north of Sharpsburg, the southern end of the field was now ready for it's own eruption of fighting. To start things off, the 9th New York regiment was about take the lead of not only it's own brigade, but also that of Harland's untried brigade. Will the Confederates be waiting and ready to meet this new threat?
Analysis - This one is a lot more fun than it may appear at first glance. This small battlefield forces both sides into combat from the start insuring lots of action throughout the entire 20 turn game. Give this one a shot if you are looking for something different. Note that the Federals have more artillery units on the map that are FIXED in place east of Antietam Creek.

86 Turns
047 - Hagerstown March
My Rating: Good
73,128
62,554
6,674
3,900
156
TOTAL
Infantrymen
Cavalrymen
Artillerymen
Cannons
65,778
56,444
4,284
5,050
202
Description - (What If, 86 Turns) Both armies are approaching each other with great rapidity. The target is Hagerstown.
Analysis - An interesting two-day battle which gives each side an advantage in either manpower (Union) or artillery (Rebels).

40 Turns
049 - Meeting at the Center
My Rating: Good
55,576
51,610
416
3,550
142
TOTAL
Infantrymen
Cavalrymen
Artillerymen
Cannons
42,585
33,739
1,521
7,325
293
Description - (What if, 40 Turns) This scenario is a hypothetical meeting engagement. Longstreet's Corps is waiting near Hagerstown and Jackson's Corps is approaching from Harper's ferry. Most of McClellan's army is marching west from Frederick, Buckeystown, and Licksville, west of the Monocracy River. Lee's must defend the gaps that lead through South Mountain. McClellan is under great pressure from Washington and must engage and destroy Lee's army. Once achieved, the war can be concluded with a minimal loss of life. Failure will prolong the war and suffering. On the other hand, Lee wants to equally engage and defeat McClellan's army, force Lincoln to recognize the Confederacy and end the war and suffering. Only one side can be victorious. In this battle, several major components of McClellan's army are still lagging behind and will not arrive in time. The Confederates will be heavily outnumbered when all incoming troops have arrived, so the Union VP level will be high. (Best played as the Confederates against a Union A/I)
Analysis - This is an amusing one-day meeting engagement scenario. Although the Rebels have a massive advantage in total artillery numbers, most of it will arrive too late to get in on the action.

15 Turns
050 - Chantilly (Historical)
My Rating: Good
21,353
20,185
418
750
30
TOTAL
Infantrymen
Cavalrymen
Artillerymen
Cannons
20,085
17,269
2,292
525
21
Description - (Historical, 15 Turns) Though defeated, Pope's Army of Virginia was not destroyed. Lee ordered Jackson's tired troops to finish the job. Take the north road to Germantown and cut off Pope's retreat. Most of Pope's army is sitting near and west of Centreville.
Analysis - A fun little medium sized skirmish at Chantilly. Both sides are fairly even and the limited number of turns insure it will be a scrappy fight all the way.

55 Turns
051 - Chantilly v.1
My Rating: Good
46,826
41,285
3,041
2,500
100
TOTAL
Infantrymen
Cavalrymen
Artillerymen
Cannons
46,166
39,569
3,197
3,400
136
Description - (What If, 55 Turns) Lee sends Longstreet to support Jackson's attempt to cut off a large portion or Pope's defeated Army of Virginia. Pope's army continues it massive retreat back to Washington D.C.
Analysis - Martha and the Vandellas "Nowhere to Run" should be your background music to this one! Over 90,000 men converging on nearby roads on a small map with no space to maneuver - only to kill. This is a bloodbath of a scenario! Not for those that like elbow room. While the Rebels have more artillery, neither side has much artillery ammo. Fix bayonets!

21 Turns
053 - Cedar Mountain
My Rating: Good
13,593
10,267
2,126
1,200
48
TOTAL
Infantrymen
Cavalrymen
Artillerymen
Cannons
13,699
12,823
110
775
31
Description - (Historical, 21 Turns) Union forces under General Banks attack and surprise Confederate brigades commanded by Generals Winder and Taliaferro.
Analysis - A fun and challenging little battle around Cedar Mountain.

21 Turns
054 - Cedar Mountain v.1
My Rating: Excellent
13,593
10,267
2,126
1,200
48
TOTAL
Infantrymen
Cavalrymen
Artillerymen
Cannons
16,550
15,674
110
775
31
Description - (What If, 21 Turns) This variant brings on additional Confederate brigades that were historically too late to participate in the battle. The VPs will be adjusted to reflect a larger Confederate force.
Analysis - This is a quality scenario. Give this scenario a play for a greater challenge than scenario 053.

21 Turns
059 - Cedar Mountain v.6
My Rating: Excellent
13,593
10,267
2,126
1,200
48
TOTAL
Infantrymen
Cavalrymen
Artillerymen
Cannons
16,550
15,674
110
775
31
Description - (What If, 21 Turns) This variant of Cedar Mountain V.1 is a meeting engagement.
Analysis - Who doesn't love a good meeting engagement?! In this setup the Yanks will reach the high ground first but the Rebs will have a few more men. Sounds fair enough.

40 Turns
064 - South Mountain (Historical)
My Rating: Good
34,246
31,284
1,012
1,950
78
TOTAL
Infantrymen
Cavalrymen
Artillerymen
Cannons
16,211
14,646
465
1,100
44
Description - (Historical, 40 Turns) General McClellan attempts to overwhelm the Confederate defenders guarding the gaps through South Mountain. If successful, McClellan hopes to divide and destroy the Confederates one Corps at a time. (Best played as Confederate)
Analysis - It's not easy, but it is fun. This battle features a very challenging geographical map and a Confederate army that is heavily outnumbered. A good game to test your skills.

86 Turns
068 - Gaps to Manassas
My Rating: Excellent
48,814
39,477
5,837
3,500
140
TOTAL
Infantrymen
Cavalrymen
Artillerymen
Cannons
48,302
41,698
2,604
4,000
160
Description - (What If, 86 Turns) By late August, General Pope was still needing a victory to ensure his position in Virginia and in Washington. For this purpose, he will personally lead the advance elements of his Army of Virginia through the gaps to Manassas and will seek battle with Lee's Army of Northern Virginia. Lee wants to take the war north and out of Virginia. To do this, he must force a major battle with Pope and defeat his army in detail. Any mistake by either side will surely meet with severe consequences.
Analysis - What a hidden gem of a scenario! This is, basically, Pope vs. Lee but without any interference from McClellan's veterans arriving from the Peninsula. The result is a battle with two numerically matched armies. Both sides have a steady buildup throughout the first day which will allow lots of time to maneuver and still fight a major battle.

30 Turns
183 - Equal Force Fight #1
My Rating: Good
7,922
7,422
0
500
20
TOTAL
Infantrymen
Cavalrymen
Artillerymen
Cannons
8,210
7,410
0
800
32
Description - (What If, 30 Turns) A June 1862 fight near Ox Hill. Stonewall Jackson and Charles Winder are marching fast toward Germantown. Union General Sigel has been charged by General Pope to engage and defeat Jackon advancing rebels. An equal force fight. No VP Hexes. Confederates have more units, with better quality, Union has better artillery and stronger individual units. Both are equal in overall numbers.
Analysis - My feeling is that this scenario probably lasts about 5 to 10 turns too long. At 30 turns both sides will wear out before the end comes. With just 8,000 men apiece whichever side can hold on the longest should win.

30 Turns
185 - Equal Force Fight #3
My Rating: Good
20,416
19,175
341
900
36
TOTAL
Infantrymen
Cavalrymen
Artillerymen
Cannons
20,064
17,334
1,680
1,050
42
Description - (What If, 30 Turns) This equal force fight depicts the forces of Beauregard and McDowell. A blind meeting engagement. Entry locations are questionable and can change with each new game. (FOR THE PURPOSE OF THIS SCENARIO, SEVERAL ADDITIONAL FORDS HAVE BEEN ADDED)
Analysis - I don't usually like multiple entry points but with the simple OOB's of First Manassas it doesn't really matter much here on this small map. The scenario is actually a lot of fun. Not a ton of room to maneuver so you will have to do some hard fighting to claim a victory here.

40 Turns
CAM_Antietam C1U1 - Antietam
My Rating: Good
97,171
84,019
7,002
6,150
246
TOTAL
Infantrymen
Cavalrymen
Artillerymen
Cannons
63,891
54,607
4,284
5,000
200
Description - (Campaign, 40 Turns) Following the battles for the gaps of South Mountain, General Robert E Lee, gathers his men near Sharpsburg, Maryland. Union General George McClellan is moving toward him. Though cautious, he continues to advance, but fears Lee will strike first. Lee's back is against the Potomac River, but McClellan's army waits for the attack order.
Analysis - Both armies are at full strength in this version of the Battle of Antietam. It will be a very bloody day of battle.
40 Turns
CAM_Antietam C3U1 - Antietam
My Rating: Excellent
97,171
84,019
7,002
6,150
246
TOTAL
Infantrymen
Cavalrymen
Artillerymen
Cannons
65,804
56,245
4,284
5,275
211
Description - (Campaign, 40 Turns) This variant of the historical scenario includes additional Confederate troops entering from across the Potomac, west of Sharpsburg.
Analysis - An extra Confederate brigade is added to the scenario.
40 Turns
CAM_Antietam C4U1 - Antietam
My Rating: Excellent
97,171
84,019
7,002
6,150
246
TOTAL
Infantrymen
Cavalrymen
Artillerymen
Cannons
63,891
54,607
4,284
5,000
200
Description - (Campaign, 40 Turns) Following the battles for the gaps of South Mountain, General Robert E Lee, gathers his men near Sharpsburg, Maryland. Union General George McClellan is moving toward him. Though cautious, he continues to advance, but fears Lee will strike first. Lee's back is against the Potomac River, but McClellan's army waits for the attack order. All Rebs unfixed.
Analysis - An unfixed Confederate army will have time to prepare for the coming Union attack around Sharpsburg.